Thursday, April 21, 2011

Big Beets

I was surprised to learn my red beets had grown quite large, not sure why I was surprised as they've been in the ground for over 2 months.  I had planned on pulling them when they were walnut shell sized at the most, but now they are about 50% larger than that.  I've got a harvest planned for this weekend, Sunday most likely so I will pull them and give away.

I'm still struggling with a garden plan.  I walk out, I look around at my different beds and start to think I have it figured out and then I lose it.  There are so many variables and unknowns:
  • How much is the liquid amber going to shade out my lower E/W beds and North ends of the N/S beds?
  • How tall will my tomatoes grow, will they shade out the entire other row?  
  • How much more can I expect to get out of my winter crops?  They seem to be going strong but I feel like I'm missing the spring planting window!
raised bed porn - I have that special feeling about raised
beds like I do my compost.  I mean... look at it, it's perfect!
I prepped the EW2 (east>west #2) bed, graded it out flat after letting the buckwheat cover crop decompose a bit.  I then dropped about 35 gallons of home made compost and cultivated that in.  Was happy to see lots of worms during all this.  This bed is ready for planting this weekend, I think I will do beans... I think, I'm not sure yet.  AHHH!

I feel like I would really benefit from an experienced gardener/farmer to walk through and say "Plant beets there, do that now, then over there you start your tomatoes, they should have been started two weeks ago!  Do bush beans there and your pole beans there.  Boy!  What the hell are you doing trying to start Spinach now?!"

Yeah, I'd like that.

Wednesday, April 20, 2011

I was hungry

I was hungry so I walked out to see what I could eat from the garden and ended up yanking out my first carrot.  While not huge, it does have good color and shape and tasted fantastic.  Glad I have many more in the works.

This is the Nelson variety which tend to be short and wide rather than tall and slender.  I just dug down with my fingers and loosened the soil and it pulled right out with very little disruption to it's neighbors.

Thursday, April 14, 2011

Partial Success

citrus rind traps are a success, although some improvements are required.

While not exactly "clogged with bugs" there are still enough PBs in each trap to make it worthwhile.  There are twice as many critters rolled up on the soil under the traps.  The first improvement would be to set the traps on top of a small square of weed cloth so they can be collected and disposed of as well.

I'll try to get to these changes Tonight and actually do a collection Tomorrow morning.  It's killing time!

BTW, I haven't yet decided how to execute the bastards.  I'd like to send a message to the others so I'm thinking something dramatic and over the top is in order.  I'll release a few survivors to tell the tale of doom.  Please feel free to make killing suggestions in the comments.

I wonder if I've hit just the right combination of words in this post to show up on some FBI website filter?

"bomb" - there, that should do it!

Tuesday, April 12, 2011

Citrus Traps

I might as well point out what we have in this photo (Left to Right):
  • Red Mustard
  • Tatsoi
  • Escarole
  • Endive
The wet newspaper trap was a failure, but I'm still confident in the strategy.  I've read and/or bed told that pill bugs and earwigs (my new #2 foe) will be attracted to citrus and melon rinds, especially if turned face down.  As I understand it they are drawn to the rind as a food source, but then stay there when the air begins to warm from the sun coming out.  The idea is that you then inspect the traps early in the AM and should find them covered with critters.

I happened to go through a bunch of oranges recently and had about 50 or so perfect hemispherical valencia orange rinds to use for traps.  Tomorrow is another early morning for me, cross your fingers I find rinds clogged with pill.... things (crustaceans?) and earwigs

Monday, April 11, 2011

Potting Up Tomatoes

The tray of leggy, indoor started tomatoes.  They have
good color but are definitely stretching for the light
I had started some tomatoes a while back and they failed miserably!  I attribute this to a few poor decisions with a dusting of newbie-ness:

  1. I started them too early
  2. I kept them too wet
  3. I didn't "pot-up" or transplant

I love tomatoes and am looking forward to growing them more than anything so you can imagine how disappointing it was to have my first attempt at growing from seen fail so badly.  I did some research and armed myself with more knowledge for my second attempt.

I placed a small amount of home-blend seed starter
then backfilled carefully to firm up the soil
One important step that I missed was the "potting up" or transplanting to larger containers as they grew.  Actually, it's not that I DIDN'T do this, but I did it incorrectly.  Tomatoes will grow new roots from the step when you bury it.  When you transplant a tomato plant you can bury it right up to it's cotyledon (seed leaves) and it will kick out new roots from the stem.  This results in a stronger plant with more vigorous root system.  It also addresses the "leggy problem" that can happen when growing indoors with insufficient light. Furthermore you can prune the lower branches and transplant the plant very deep to encourage additional root growth.  Another method is to plant them horizontally and the buried part of the step will root.

A good 2" of stem buried and if these things do what
everyone says they do then it should root from the stem
So I took about an hour work work Tonight and transplanted most of my seedlings from their cell tray into 2.75" organic pots.  The process was rewarding as the seedlings were leggy and weak when in the cells, but after transplanting they just... looked healthier and stronger.

Once they were transplanted I watered them in thoroughly and put out for a bit of late afternoon sun. Now they are back in the safety of the growing room (my extra bathroom) and I will begin hardening them off over the next couple weeks.


Back in the grow room with 14 of light a day
By the way, I have included a link on my blog's "links widget" to a concise and simple article explaining in more detail the steps I basically did here.

Sunday, April 10, 2011

Just Photos

Spinach with onions in between the rows
I do this just about every night and it hasn't got
old yet!

Saturday, April 09, 2011

Pill Bugs 1, Steve 0

I was researching organic methods to deal with my pill bug issue and read what sounded like a perfectly logical method to capture them; rolled up wet newspaper laid on the dirt.  It made perfect sense to me, I knew that pill bugs breathed through gills (seriously, read about these things, they are kind of cool) and thus required damp environments in which to breath.  I also had observed that they like to crawl into and under things to hide.

Anyway, I was all fired up to try it so I grabbed a fresh cocktail and headed out to the shed to set some traps.  I was excited, I felt like I was really on the right path!

I set my traps, moving slowly to enjoy my drink, AM talk radio and chill time.  I feel asleep satisfied, eager to awake and check my traps, fully expecting them to be saturated with sleeping-about-to-be-smashed pill bugs.
6:15am next morning, shoes and jacket on and I headed out to what would be four empty traps, not a single pill bug in sight.

Friday, April 08, 2011

Corn Looks Promising

It's been warm enough lately that I pulled the lid of my low hoops on the corn bed.  To be honest, I was more motivated by the fact the corn had grown up to the top of the hoop tunnel already and I feared it would either burn or rot from constant contact with the condensation.

The timestamp on the photos is nerdy and will prove a nuisance should I want to print a photo for display, however I think the value of seeing the date/time as a reference is worth it.  I'm planning on reviewing this blog when I prepare for next year to refresh my memory on what was happening.  Well that and I'm so narcissistic I just love to read my own words!  ;0)

Tuesday, April 05, 2011

Who Is This Is?

I've had sporadic issues with the pictured critter to left.  Usually found chewing away the edge of leafy stuff.  I've looked through my books but can't make a positive ID although I suspect it's either an Armywork or Corn Earworm.

Decided to ask on GardenWeb.com in hopes some wise soul will identify.  Once I know what I'm dealing with I can begin designing my strategy to deal with them.

I've seen them up to 1-1/4" long...

Sunday, April 03, 2011

IT'S ON!!

The deceased - inspection prior to composting
The Pill Bugs really escalated things Today, they took it to a level I had hoped to avoid.  Only recently had I accepted that the little shits will chew on the lower leaves of my pea plants, maybe even snack a bit of spinach.  While none of this made me happy I had resolved to leave-them-be after feeling I won the last battle by removing the live sod acting as their fortress and launch point for attack.  With the sod cleared I turned the dirt and (hopefully) obliterated copious amounts of young and breeding-age bugs.  This, I assumed, had sent a clear message that I mean business and will kill indiscriminately if pushed.

CAUGHT IN THE ACT!!
You know what they say about assumptions...

I'm a fool for misjudging my opponent, for making assumptions about an enemy I only recently began to study and understand.  A fool for thinking that anything less that total annihilation would be sufficient!

They killed my snow pea plant, they sucked and chewed away at it's vulnerable stem until it finally gave up, unable to provide water and nutrients to it's top growth it had been tiring for weeks to grow.  I came upon the deceased slumped on it's trellis mesh, limp, pale green baby pods already beginning to curl in the heat of the intense sun... flower petals still clinging to the tips as if not yet ready to send the pod into the world alone.

Brothers, not even 2 months old...
A quick observation of surrounding plants and their stems at soil level proved what I suspected, and deep in my heart already knew; the pill bugs did this.  I took immediate action to protect the living while simultaneously plotting my attack.  This aggression will not stand (extra credit to cinematically-enlightened soul that guesses that movie reference!!), I will not sit idly by while my prize snow pea plants (and who's to say the Spinach aren't next?!) are reduced to compost greens!


OK, I ran out of steam and interest on this post.  If you happened to be enjoying up to this point I'm sorry, but it's late and I'm tired and sleepy.

Maybe too little too late?
A cut up soda can installed as a physical pill bug barrier.

Saturday, April 02, 2011

Compost Maintenance

I've also got (2) 35 gal. trashcans full to use!


My compost has been majorly neglected for the past month or more, mostly due to my back being sore and my workload being overwhelming.  I really, really need some compost though so decided Today to suck it up and put a little work into my compost investment.
Two main tasks to accomplish:
  1. Add "greens" (in Today's case this was lawn clippings) to the intermediate pile and flip (aerate)
  2. Remove and screen the 95% complete compost from the Compost Tumbler and prepare it for the intermediate pile once it's cooked a bit more
I used the opportunity to make a time-lapse video which I haven't done in a long time.

Friday, April 01, 2011

Watering Reminder

They say admitting your problem is the first step to recovery.

I will be the first to admit that I over water.  It's my nature, I walk out in the yard and I look at my plants and I want to "do something" and watering gives me the satisfaction of "doing something".  I have a problem and I'm working on it.

I was out on slug patrol and while looking closely noticed that what I thought was a single spinach plant was actually 3 tightly grouped.  I carefully pulled the two smaller ones out and was pleased to see how deep the tap root had gone.  A very visual reminder of how inappropriate it is to water based on what the surface soil looks like.

I'll think about this doomed spinach, posed on the backside of my spinal decompression receipt (AHH!! $$$!!!!!) the next time I reach for the hose.

Thursday, March 31, 2011

Foxy Roxy

Roxy after about 20 minutes of playing with the hose
Worked from home Today and had my parent's dog overnight.  Roxy and Chui are buddies so I try to have her over once a week to play around with Chui, it's good for him.  So no farm updates really, things are looking OK, not much to report.  Hoping the 86+ degree weather doesn't send cool weather crops bolting.

Wednesday, March 30, 2011

Floating Row Covers

Pipes around the perimiter keep the edges down, then
I use stakes on the ends.
I'd like to get some old fire hose and fill it with
sand as a perimiter weight.
Laid down my floating row covers that I purchased.  I'm hoping these will reduce the chomping that's happening at night, although the problem is that a few of the pests I have actually live in the soil.  I plan to use this more on new beds when I direct sow.  The idea is that it's so light weight the plants will lift it up as they grow, or it will "float" on top of them as they grow.

You can just barely make out the beet
seedlings under the cover
        

Monday, March 28, 2011

Mulch Madness!

See that title?  See how clever I am??

Busy work(day job) day, not much farm action.  The mulch on the carrots and beets is working perfectly, you can definitely see the difference in the darkness of the dirt where it's wet around the mulch.  I planted a long band of onions in the West 50% of EW5 on the North end which I'm hoping will reduce the shading on plants on either side. In the East end of that bed I had previously planted alternating North-South rows of spinach and onions and later realized that the onions will most likely shade out the spinach a bit as the sun heads for it's Westerly home.  This time with the onions planted as a backdrop to the spinach there should be plenty of sun to go around.

No photos Today but I caught Chui eating Japanese Beetle Grub Carcasses (When I find em' I step on em' and they "pop" with a stream of guts shooting through the air.  Good fun!)  Anyways, he eats them which isn't surprising considering dogs also like to eat cat poo ("Cookies" I've heard them called) and then later, after I'm deep asleep and in the middle of a Zombie nightmare, typically about 3am I'll wake to his dry-heaving sounds as he is about to barf.  I leap from bed while conjuring up my best "good dog" sweet voice calling him to follow and SPRINT (negotiating several 90degree corners on varying surface materials) to the back door, all in the hope he'll finally yack outside.

I didn't realize until writing with such detail (and pleasure) about my grub murdering that.... this is Karma; Chui barfs and ruins my night because I kill grubs.

Sunday, March 27, 2011

Mulched Carrot Seeds

Yet another fine example of quickly I would be fired if
I worked on a real farm.
I came across a blog that pretty well represents where I sometimes see myself in a few years; Tiny Farm Blog is full of great stories and information from someone who, like me, started with zero farming knowledge.  I think they are on their ninth year now and have grown quite a bit although it's great to see that even after nine years they continue to learn.

Anyway, I came across a couple posts about mulching newly sown carrot seeds with various materials; burlap, weed screen/landscape fabric, etc.  See, carrots take their sweet-ass time to germinate and they MUST stay moist during the 2-3 weeks it takes for them to wake up.  It can be a challenge to keep them moist without a single failure, especially if you are like me and have a day job.  The idea of mulching now seems so obvious a solution I'm annoyed I didn't think of it myself!  I ended up using weed cloth, triple folded and staked to the beds to cover my new seeds.  Because I sowed between existing rows it was a bit more work, requiring a "strip" of mulch for each row.

14awg wire for "stakes" - you could also cut up clothes
hangars if you have extra...
I crafted some cheap-O stakes from 14awg galvanized wire to hold things in place.  While I was at it I also covered up my new beet seeds.  It's about 60 degrees Today with Wednesday forecasted to be in the mid 80's and I imagine I'll need all the help I can get to stabilize soil temp and moisture.

Had to thin out some of my carrots and it's
 fun to see... well, to see that they ARE carrots!

Saturday, March 26, 2011

Sowing, Transplanting and First Harvest!

new carrot rows between existing rows.  I'm hoping that the
existing ones don't shade out the new seedlings.  An even
bigger worry is the liquid amber that's budding new leaves
and may shade everything out.  Chainsaw.
Spent a couple hours Today before I head off to the gun show to sow some additional cool crops:

  • 2 more rows of each carrot, sown between the existing rows after reading and getting the impression that I had spaced my rows too wide
  • 5 more rows of beets directly sown between the existing beets and carrots
  • transplanted ~20 each of Tatsoi, Escarole and Endive in the North end of SW1 bed
Part of the transplanting to SW1 was removal of existing plants, it was primarily Collards which I learned I don't much care for.  No tears for the Collards.

I couldn't really figure out the best way to remove the plugs from the cell sheet.  I ended up pushing up the bottom to release the contents, then squeezing the side like you would an otter pop.  Another method I tried was to push the bottom with my finger while gently pulling up by some of the leaves.

Loosened the roots and dropped em' in place then a good long drink and I'm done.  I like direct sowing much better, transplanting takes a long time and feels like double work.

I'm also sending out my first harvest notification because I realized I have a bit more than I can eat right now.  Still MUCH less than I intended to get up to, but just enough for one or two people to come get salad stuff.

Available stuff:
  • Smooth leaf spinach
  • Savoyed leaf spinach
  • Baby beet greens
  • Baby Swiss Chard ("Bright Lights") Greens
  • Tiny bit of Arugula
  • Regular Chard (lots of bug holes)

Thursday, March 24, 2011

Recovering From a False Start

The hand clamps on the end stakes keep the end of the tarp
in place and make it easy for me to open the ends to vent
or water or just check on things.
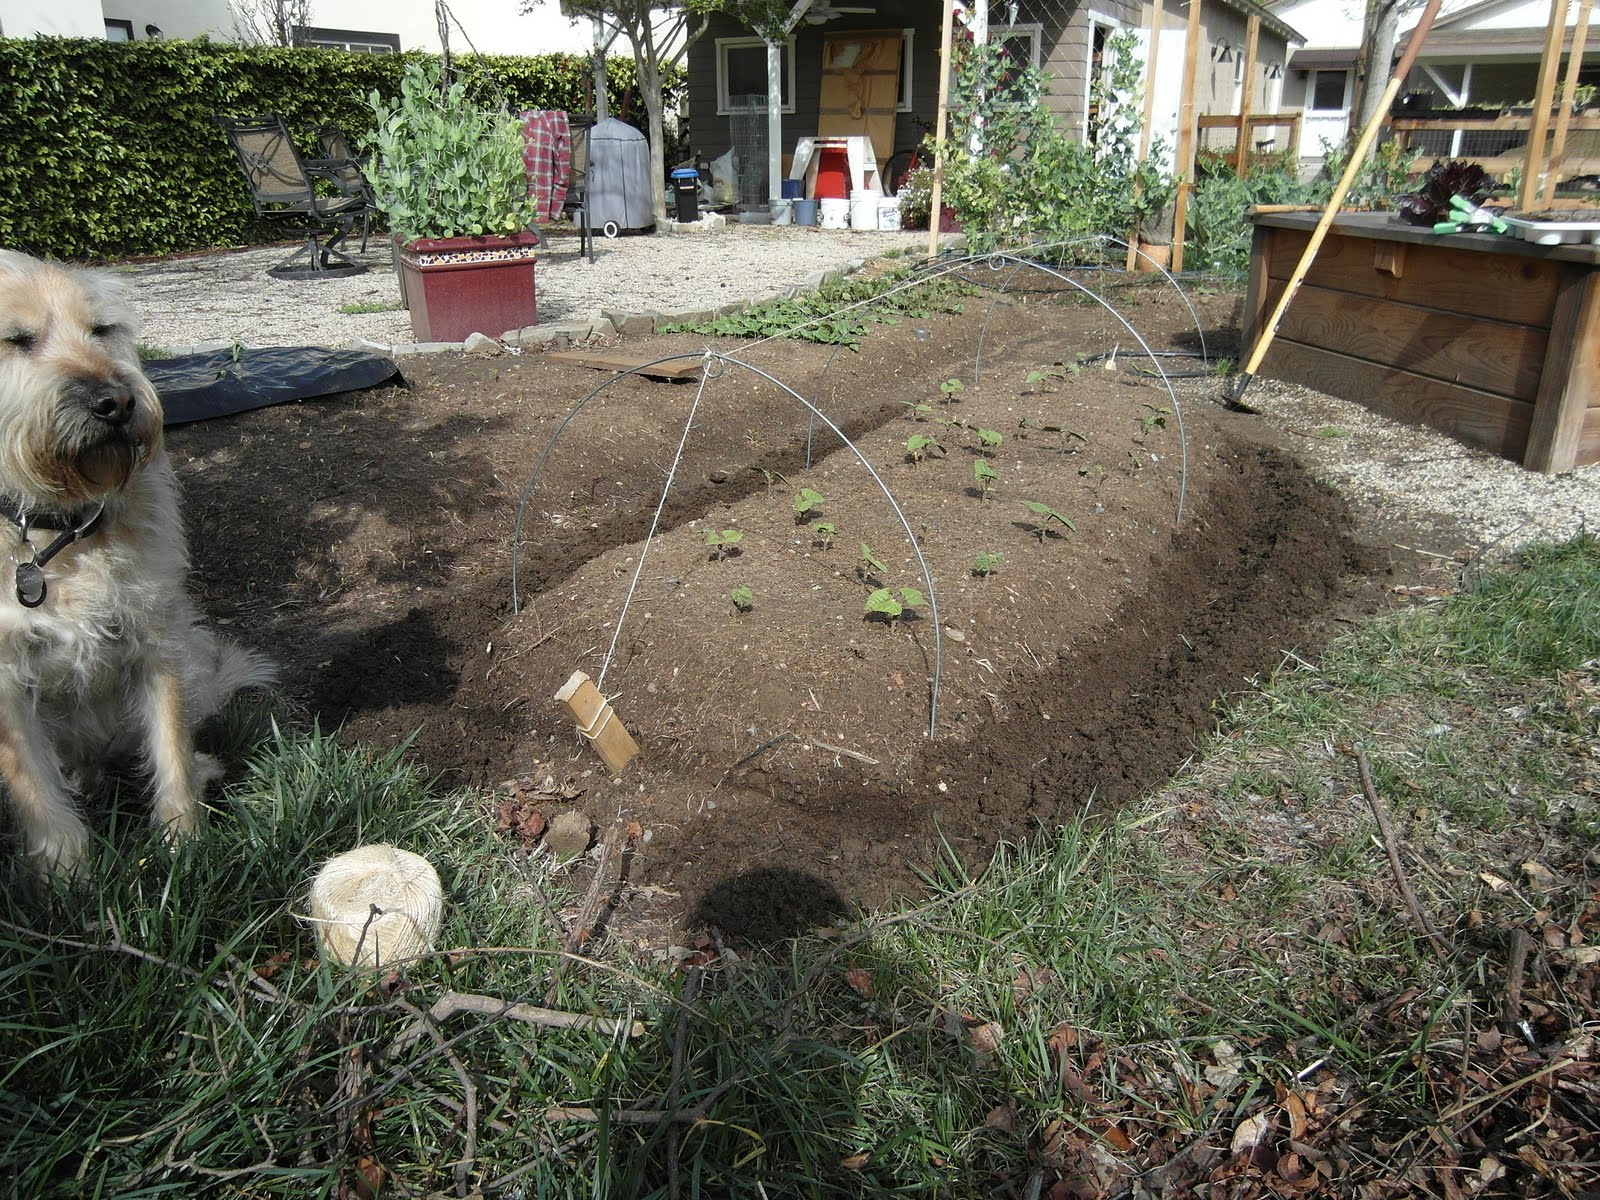
A couple weeks ago we had a nice warm week, the spring-like temperatures holding right on through the weekend.  I interpreted this as a good time to start some of my early warm weather crops, stuff like bush beans, bell peppers,early sweet corn, etc.  I direct sowed the corn and beans into my beds and started lots of peppers (and some more beans) in cell containers for later transplant.

Then it cooled off.  It cooled off a lot, about 15 degrees and we had two storms come through (a third as I write this).  My warm weather guys stopped growing, they started to pale in color a bit and generally not look so hot.  I figured I'd use the opportunity to dry some basic home made low tunnels to increase the temp, create a sort of little mini-greenhouse.

Hoops and anchor stakes in place for the bean bed
It was actually really easy, between Eliot Coleman's guidance in Four Season Harvest and the various images and videos I had seen online I knew how to tackle the problem.

  1. I purchased some 3mil plastic tarp
  2. 170' of #9 "tension wire" used for chain link fences - this would be used for the hoops
  3. Garden hoe
  4. Gather my twine, some stakes and a couple hand clamps
Hoops tied together with twine and anchored at each end
to the stakes.  If he's not lying down he's sleeping
standing up... bastard!
Funny side note on the wire: Was at Home Depot and the price was missing from the wire so they had to lookup the price in their photo reference book.  Well, they picked the wrong item and rang it up for about 1/2 what it should have been.  I love it when that happens and I don't feel bad about it; god knows I've spent enough money there.

Anyway, so I figured out the shape and size I wanted the hoops to be, then made some pen marks on my workbench as reference so I could create reasonably consistent pieces.  I then stuck them along the bed and used my twine to tie them together and anchor to the stakes at each end.  I used the Hoe to drag a shallow trench around the perimeter of the bed to bury the edge of the tarp material to keep it down.  I then draped the tarp over, pulled it tight at the ends and kicked dirt back over the edge of the tarp.  Done, easy.

corn bed with soil warming black plastic
I placed my various cell containers of seedlings in between the beans plants so they can bask in the heat as well.  After the this bed was done I moved on to the corn and did pretty much the same thing.  Start to finish, including Home Depot trip I'd say this took me two hours which was a perfect break in an otherwise hectic and busy work day.


Tuesday, March 22, 2011

BountifulGardens.org - Waste of time!

March 7th 2011 I placed order #6185889 for the following items:


  • VGR-3825       Aurora Orach                  2      $4.00
  • VGR-3800       New Zealand Spinach, Greens   1      $2.00
  • VGR-3750       Egyptian Spinach Greens       1      $2.00
  • VGR-3790       Malabar Spinach Greens        1      $2.50
On March 17 when I hadn't received my order I called to ask about it and was told "it hasn't shipped, we're really busy, everyone wants seeds right now"  Not really an apology, not a "Oh I'm really sorry for this delay, I know we're probably throwing off your schedule. We'll try to get it out ASAP, SORRY!"  The woman on the phone said that it would "definitely go out that day" and that she would "tag it" or something like that that I took to mean she would make sure the warehouse got it out that day.

You sell seeds, that's your business.  You purchase, market, sell and ship seeds.  Don't tell me "we're really busy, everyone wants seeds right now"  Work late then, hire temp help, work weekends - get it done.

Today I still had not received my order so I called again to ask.  I was told "Looks like we're waiting for the Orach" to which I responded "This is ridiculous, just cancel my order"

So, I wouldn't suggest that anyone order from BountifulGardens.org.  It's one thing to get caught by surprise and under deliver, I could handle that if they had the right attitude but this company couldn't have cared any less if they had my business.  So they won't and I hope that some people reading this will consider this before ordering from them as well.

Thursday, March 17, 2011

Spinach and Onions

My latest crop of spinach is starting nicely and I mixed in some green bunching onions in between the rows.  I've learned that rows, the way I've been using them, are not efficient use of space.  I'm looking towards "banding" or grouping to better utilize my limited space.

I was disappointed to find that the shredded leaves that I integrated into the two large East-West beds are untouched by worms and do not appear to have decomposed at all.  Disappointed because I need to plant in those beds soon and I'm afraid that he active decomposition (assuming it starts, god!) will throw things off.  To make matters worse, my buckwheat cover crop will be turned in soon and that will create a nice composting situation right there in my bed.  Great.
/sarcasm

Tuesday, March 15, 2011

Coming Out Party for my Snow Pea TeePee

I shamefully mentioned my attempt to utilize yard debris in a creative and clever way, reminiscent of some page from Sunset magazine.  Well.... I'm actually kind of happy with it.  I admit it's not tall enough, but the snow peas are thriving and climbing and I anticipate a great harvest from them.  Yeah, I know I used "and" when I should have used a comma.

Sunday, March 13, 2011

Corn Workin'


Was happy to see my Corn make an appearance finally.  We've had some warmer weather so I'm thinking that pushed it into action.  I've setup the pattern so that I will hopefully get decent pollination without manual intervention from me.  See, corn is really amazing, it self-pollinates(monoecious) as it has both a male and female flower.  The mail flower is at the top, the "tassel" and the female flower is the corn silk that protrudes from the husk.  A silk for each kernel; any that are missed will leave a blank spot in the cob.  So the wind blows the pollen from the tassel which with the assistance of gravity falls down making contact with (and sticking to) silks along the way.  As if that wasn't amazing enough, as each silk is pollinated it will turn brown and dry up - it's job is done.

In situations where you don't take this incredible natural process into consideration and plant corn in a less than ideal configuration you will need to manually pollinate.  Quite literally you will need to take a section of tassel and present (shake, rub - whatever) onto the silks.  It's works, I've had to do it.  ;0)

I planted an early variety that will hopefully handle the still unstable weather and occasional cool day/night and still yield a decent harvest. I like corn, but I already have this feeling that in a "space-challenged" growing area it may not be worth the work.

Friday, March 11, 2011

Moving Day

larvae attached to the lantana leaves, I removed the whole
leaf rather than try to remove the larvae
This morning before work I carefully harvested ~30  lady bug larvae as well as a few juveniles into a bag to relocate in my vegetable garden.  As I was scanning the lantana bush I noticed several more mating pairs so I should have a supply for a couple weeks.

I placed the cut off leaves with larvae attached on or near the most heavily infested plants in the garden, the plan is that they will begin to hunt the aphids and other soft bodied pests that have been increasing in numbers lately.  I'm also going to get some lantana and flowers in the ground to try and keep the lady bug colony thriving.

a few juveniles and many larvae
Example of some lantana leaves placed on the
red romaine lettuce.

Thursday, March 10, 2011

Lady Bug Larvae

Not my photo, I ripped it from the interwebs.  Whatever!
My Dad was over the other day for a meeting and to do some work in my garage.  We were BS'ing as he was leaving and mindlessly picking and pulling at a large, overgrown Lantana shrub in my front yard.  One of us noticed this strange insect that looked like a mix between crocodile and a tick - it's hard to explain.  Anyway, we both get our knives out and start gently probing to see what it is, trying to get them to move, fly, whatever.  Frustrated, the intensity of the inspection escalated and quickly turned destructive as we realized their heads would stay attached to the plant if you push the body hard enough.  hehehe...  He drove away, the bug remained a mystery.

While researching the various insect pest problems I'm having I came across a photo of the very insect we were molesting just days ago and hotdamn! - it's a ladybug!  Of course there will be no more senseless killing, but rather nurturing and care.  I plan to remove several of the branches and relocate to my vegetable garden area with the highest aphid population, I'm  hoping I can get a ladybug colony established.

I wonder if these larvae are the love-product of the frisky two I spotted awhile ago?  Actually, they were gettin' busy on my broccoli (good location, I have aphids here) so why would she fly her self East 30 yards to deposit eggs on my Lantana? Crazy ladybug...

Tuesday, March 08, 2011

Complacency

I've noticed a spike in evidence of leaf chomping lately, it seems that just about everything is being chewed on a little.  I feel guilty because I know, deep down inside my procrastinating little heart that I'm responsible; I've become complacent and eased my assault on the SLUG!  Sure enough a quick night hunt (I'm just back, exhausted and refreshing with some Stoli on the rocks) was productive, easily I bagged 10+ slimy little bastards, may their souls rot in hell for all eternity.

A day without learning is a day wasted - I just made that up and while not terribly profound or original I do like the sound of it and it's how I live my life.  With that said, I noticed I have the no-longer-so-cute "rollie-pollie" (Armadillidiidae - "Sow Bug", "Pill Bug") bugs ALL OVER THE PLACE, in fact next to the Boxelder I'd say the pill bugs are the second highest population in my garden microcosm.  I did a bit of research and while not typically considered a pest, they are of very little value.  Furthermore they can, in Southern regions and in large quantities (like mine!) be destructive to plants and eat live plants in addition to decaying organic material.  Pill bugs are now being considered for my kill list.  Stay cool boxelder, keep doing your thing, stay away from my garden and we're fine.

I'm also noticing aphids all over stuff.  Of course I'm using organic methods which means I can't just start spraying poison all over the place like I'd like to.  I've consulted my books and the guidance is varied with "increasing beneficial insects" as the most common theme.  Id' love to! - but it's not easy to get lacewings, lady bugs, assassin beetls, etc. to show up and stick around.  I'll be buying some flowering shrubs and annuals to hopefully attract them.  The second most common suggestion seems to be using a strong stream of water to blast them off.  I'll try everything and hit them with the full assault.

Monday, March 07, 2011

Seeds are Shaping Up

(left to right) 3 rows of swiss chard "Bright Lights", single row of
golden beets and on the far right a single row of red beets
I'm finally seeing some of my seedlings begin an active growing cycle, they had largely stagnated for about a month, but I suspect some recent warmth and possibly the longer days have kicked them into action.

I'm still having uneven germination and growth rates but I'll worry about that later. While doing a little thinning I was eating the micro greens rather than toss them and was AMAZED at how delicious the spinach was - I have never tasted buttery, sweet spinach before and if that's what I'm in store for then this will be well worth the work.

Sunday, March 06, 2011

Disabled List

Majorly agitated my already messed up back on Saturday, woke up this morning and couldn't even get out of bed properly.  No work Today, hopefully me back will calm down while I sleep Tonight.  Beautiful day with a nice slight breeze, new seedlings emerging nicely, things looking good overall.

Saturday, March 05, 2011

Lights and Night Shots

Taken around 8pm with a 6 sec. exposure and ISO100. This was shot
from my compost corral and you can see the growing area in the background

I think the lighting is so cool, it's eerie 'cause
this is was taken late at night
Installed some xmas lights in the "entertaining area" adjacent to the farm.  This part of my yard is where meals are had and most of the drinking happens.  The new lights are stung on a supporting metal cable so I don't need to worry about them failing under their own weight.  I used this as an opportunity to take some long exposures with my new camera.

Friday, March 04, 2011

Nothing to Report

No news, just a Chui photo cause he's such a great dog.

Taken through a video camera fisheye lens attachment
then cropped down a bit

Tuesday, March 01, 2011

Email Notifications - Sign Up Now

I setup a free (ad supported) email newsletter management service.  This will let people subscribe (and unsubscribe) to Maiden Farm's "harvest updates" that I will send when I have veggies available.  The idea is that friends and family sign up, then when I have some beans, tomatoes, carrots, compost - whatever, ready to give out I will send an email to everyone subscribed.

To signup you use the blue/gray box on the right side of the blog.  Check your spam folder and be sure to add the sender to your "safe sender" list to keep the emails out of the spam folder.

Beans, beans, beans, I love beans

I like beans and other seeds that are big and grow fast and blast out through the soil and present themselves appearing totally ready for action!  Carrots, with their fussy requirements and tiny little seeds are the polar opposite of beans - carrots are weak and lame, beans'r tough!